
Main > Sell > POS
< All Topics
Go to Sell -> POS
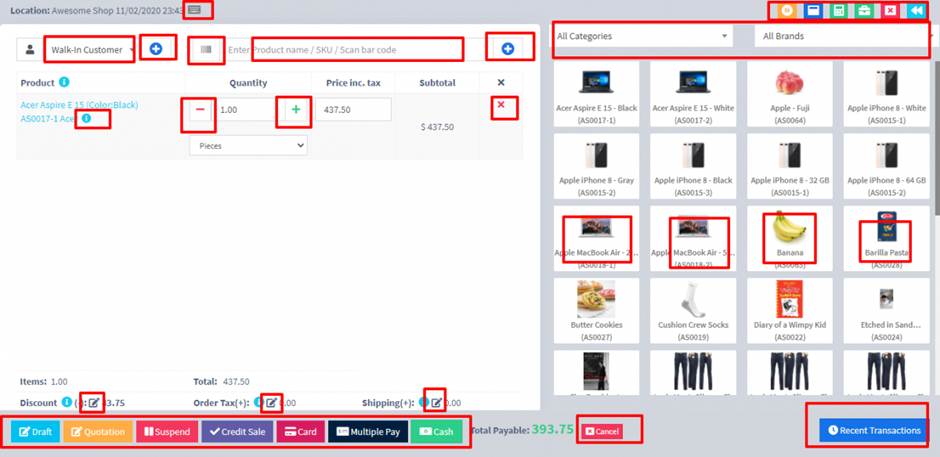
Interactions points in POS Screen.
Selecting Customer: #
By default, there is “Walk-In Customer”. You can search for a customer by name/customer id or phone number or can add new customer by clicking the plus (+) button “Add Customer”.
Searching & Adding Product: #
Enter “Product Name” Or “scan the barcode” to search the product. If multiple products are matched then it displays the dropdown of products, selects the product from it. Or if there is a single product then it directly gets added to cart.
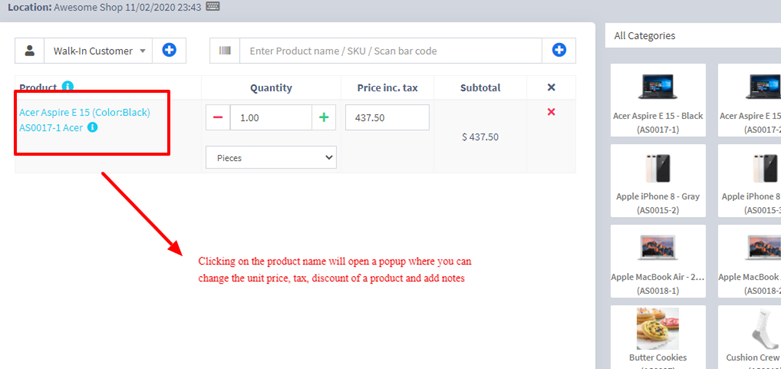
Changing Product Price, Tax & Discount for a product: #
- After the products get added, click on the product name to modify product price, tax & discounts.
NOTE: Option for different tax in products will be shown only if - Inline tax is enabled. You can enable it from Business Settings -> Tax -> Enable Inline Tax in purchase and sell.
Selecting Lot number for a product #
- If lot number is enabled then it will show the option to select lot number. (Enabling Lot Number)
Selecting Expiry for a product #
- Expiry Date: If the expiry date is enabled then it will show the option to select lot number. (Enabling Expiry)
Cancel Sales: #
To cancel the “sales” click on the “cancel” button. Cancel invoices are not saved in the system, so no stock will be deducted.
To finalize the invoice, click on Finalize – Add the payment options and save it.
On save it will display an invoice printing option.
NOTE: For invoice to print correctly – The Margins options should be set to “Default”.
List of sales can be viewed from Sell -> List Sales.
List of drafts can be viewed from Sell -> Drafts.
Both Sell & Drafts can be edited to make any changes.
Express Checkout: #
Express Checkout means the sale will be marked as Paid and the payment method will be cash. No separate payment screen will be displayed. Printing of invoices depends on the business location settings.
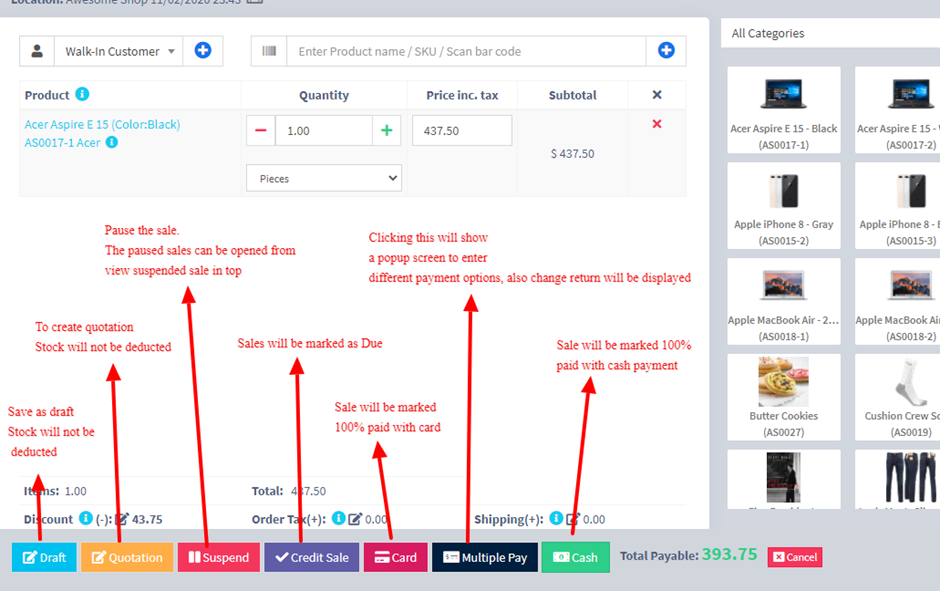
100% Credit Sales #
- To sell on credit to the customer you first need to enable this button by going to Settings -> Business Settings -> POS -> Show Credit Sale Button
- Then on the POS screen, you will be able to see a button “Credit Sale”, simply click this button to make sales on credit.
Half Credit & half payment Sales: #
Suppose invoice amount is $1000, customers pays $700 cash and $300 is credit amount on him, then follow these steps:
- Click on multiple pay button
- Select the payment method and enter the amount paid by the customer. ($700 in our example)
- Click finalize payment.
- Now, the pending amount is automatically added as a credit amount on him (or amount to be taken from the customer)
Previous sale amount in Sales: #
If a sale is made for the customer for a subsequent time for the same product, the previous amount in which the product is sold will be shown for reference in add sale screen.


